| www.belightsoft.com/.../roxioedition.php | Start of Help > Modifying Documents |
(some features require the standard version)
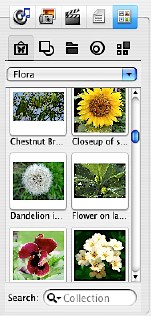
The program allows using images from different sources:
The internal image collection contains a separate collection of vector images - Smart Shapes.
Some operations common for different objects are described in Operations on Objects.
Images are separated on the Clipart tab depending on their location and kind.

To insert an image supplied with the program:
To insert an image from the iPhoto library:
To insert an image from a file on the disk:
To insert multiple images from a single folder, open the Clipart tab on the Source panel and click the "folder" icon or select the Window/Clipart/Custom Folder menu item. You can also use the Folder button on the Photos tab of the Source panel.
By default, the program shows images included into the selected folder only. In this mode, the pop-up list at the top of the Clipart panel lets you access content of the subfolders.
To preview images from all subfolders, enable the Get Images from Subfolders option in the Browse window. Note, that Clipart may show images with some delay depending on how many images are in the folder.
To find and download an image from the Internet:
If Image Tricks was installed on your computer, you can use its generator plug-in to create images for the document's background. Without the Image Tricks plug-in the internal image generator will be used.
To add a generated image:
To add an image without adjusting its parameters, choose a generator from the Insert / Image / Generate Random menu.
More details on generators can be found in Image Tricks documentation.
Images you work with can be put into the internal image storage (Image Depot tab). It can be used to save images you have generated. You can also collect images from different sources into a single place to access them later quickly.
To add an image into the clipart, select it in the document and click the "Plus" button. The image will be saved on your disc.
To open the folder containing your image storage, click the "wheel" button.
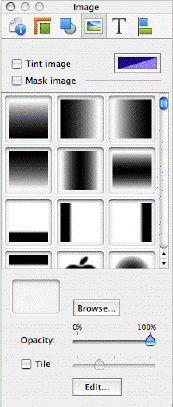
On the Image tab of the Inspector window you can set the tint color for an image. Click the Color button to select a color.
To change transparency of an image, use the Opacity slider.
The Tile Image tool creates multiple down-scaled copies of the image in the rectangle that the image takes. This feature can be used for decorating your designs.
To tile image, select it and choose Format/Image/Tile in the menu or tick Tile in Inspector. Use the Tile slide bar to adjust the number of tiles and their size.
Images have a special attribute related to import. If Set Image as Replaceable is enabled in the Format/Image menu, the image will be replaced with an imported one. The program will preserve the size and position of the original image. If the new image has different proportions, it may be cropped.

To apply some interesting effects to your images, use the Mask Image option from the Image tab of Inspector.
Select an image, check the Mask Image checkbox and select a mask from the collection on the Image tab.
If you want to use your own picture as a mask click the Browse button and select an image file. Or simply drag an image into the mask preview box located to the left from the Browse button.
From time to time you may need to use part of an image. For instance, you have a photo, part of which you want to use in your design. To cut a piece of the image, use the Crop Image tool. To apply it, select an image and click the Edit button on the Image tab of Inspector or simply double click on the image. The Edit Image window will come up. Set the appropriate scale and then select the region to crop and click OK. The selected part of image will appear on your document.
Note: If you're working on Mac OS 10.4 or later and have installed the Image Tricks application for working with Core Image filters, make sure that the Crop tool is selected in the Edit Image window.
The image inserted into the Smart Shape looks as if it was cropped in the form of the Smart Shape.
For more information see Filling Smart Shapes with Images.
The Core Image filters are available for users of Mac OS 10.4 and later (you'll need to install Image Tricks before use). To start working with filters, double click on an image.
Installed filters are listed in the Edit Image window. The filters are organized in categories (color, blur, etc.).
Some filters have adjustable parameters. If such a filter is selected, the corresponding controls will be enabled at the bottom of the window: slide bars and the Color button (which opens the Colors panel).
The picture in the preview area immediately changes after selecting a filter or if you change parameters of the selected filter. Every time you select a new filter, you'll see the result applied to the original picture.
Some filters have an additional parameter. Effects that have such a parameter allow you to edit images with a mouse click directly on the image. The mouse click will be the base of distortion or other effect. When you move the mouse pointer on the image with the button pressed (the left button for a 2-button mouse), the image changes in real time (the reaction depends on the performance of your computer and of your graphics card).
The filters for which you can select such a point are marked in the filter list by the crosshair icon on the right. When such a filter is selected, the mouse pointer also looks like the crosshair.
Filters of another type are marked with a "colored ball" icon. This means that such a filter has color as a parameter. Selecting such a filter will enable the Color button.
To access the Core Image filters via the Edit Image window, install the free Image Tricks application. More information related to Core Image filters can be found on the Image Tricks Web page:
http://www.belightsoft.com/imagetricks
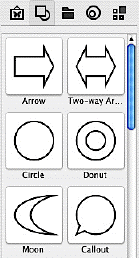
Smart Shapes are vector images that can be used to decorate your document or for other purposes.
To add a shape, open the Smart Shapes tab on the Clipart Collection using the Window/Smart Shapes menu command. Drag and drop a shape on the design or click on it.
Smart Shapes behave mostly like ordinary images. In addition to the operations applicable to images, some Smart Shapes have one or two adjustable attributes.
Operations on shapes are available from the Inspector window. Open it using the Inspector button on the toolbar or through the Window/Inspector menu.
The main attributes of Smart Shapes are Border Line and Filling. You can modify them on the Fill & Shadow tab in Inspector.
The most common operations are described in Operations on Objects.
To some shapes the Curve and Side Count options (from the Geometry tab of Inspector) can be applied.

For example, the 5-point Star can change number of rays by means of the Side Count control and the angle of rays by means of the Curve control.

In addition to Smart Shapes, the Clipart collection contains a collection of Basic Shapes: circles, rectangles, arrows and other. They are PDF vector images (that is, they don't have the special attributes of smart shapes). To find them, open the Clipart Collection tab of the Clipart panel (menu Window/Clipart Collection) and select Basic Shapes in the drop-down list.
Smart Shapes can have a transparent body or can be filled with solid color or with an image. These options are on the "Fill & Shadow" tab of the Inspector window. The image, used to fill the Smart Shape, is shown in the "Fill & Shadow" section of Inspector.
The feature can be used for making collages.
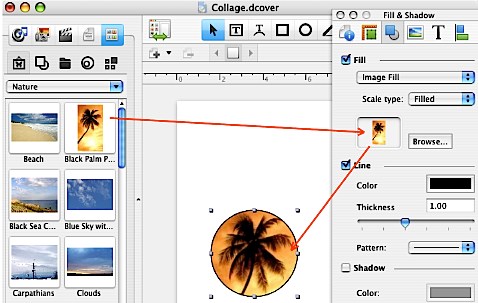
The image inserted into the Smart Shape looks as if it was cropped in the form of the Smart Shape.
To fill a Smart Shape with an image:
If your image is in Clipart or was imported and is shown now on the Source panel, select the Smart Shape and click on the image.
Scale options affect how the image will be modified when inserted into the Smart Shape.
To insert a part of the original image into the frame:
A rectangular Smart Shape filled with an image may look like the image itself. You may need to know for sure what was used in the design.
Smart Shapes (when selected) have "Color Fill" and "Image Fill" items enabled in the drop-down list on the Fill & Shadow tab of Inspector. When you select an image, only "Color Fill" is enabled. Use this to distinguish the objects.