(click outside the text box)
(click on text)
(double click on text)


(editing cursor is visible)


(separate edit box will open)
| www.belightsoft.com/.../roxioedition.php | Start of Help > Modifying Documents |
Most of the text formatting tools are located on the Text tab of the Inspector window.
Some operations common for different types of objects are described in Basic Operations on Objects.
Disc Cover supports regular and circular text. The toolbar has separate buttons for adding each of them.
Regular text box can be added using:
To add circular text, select the Circle Text tool. Then press the mouse button when the pointer is somewhere in the document and move the mouse to resize the imaginary circle that outlines the text. Then release the button.
The circle will have center in the middle of the design element and will pass through the point, selected by the mouse. After releasing the mouse button an edit box will appear in which you can modify the text.
To delete a text box, select it and press the Delete button on the keyboard.
To modify text, double-click on it.
You can change font attributes and color of the text inside the text box by using the system Font and Colors dialogs.
If the entire text box is selected, the changes you make in the dialogs will apply to the whole text. If a portion of the text is selected, the changes will apply to the selected part only.
In Disc Cover regular text can be arranged in multiple columns. The first column is added as described above, other columns will be linked to it. See more details in the Linked Text Boxes and Flowing Text section.
| Text box type | Deselected (click outside the text box) |
Selected (click on text) |
Edit Mode (double click on text) |
Regular text
|

|

|
 (editing cursor is visible) |
Circle text
| 
|

|
 (separate edit box will open) |
To rotate a text box, select it and use the Rotate slide bar or type the angle value into the corresponding box of the Geometry tab of Inspector. The entire text box will be rotated.
To resize a text box, select it and using the mouse pointer drag one of its handles on the selection border.
Text can flow around the inner and outer margins of the disc design element.
To enable text wrapping, set the Cause Text Wrap checkbox on the Design Element tab of the Inspector window.
Use the four buttons in the Format section of the Text tab of Inspector to align text. If the entire text box is selected, the option will affect all the text. If a part of the text is selected, only the selected paragraph will change alignment.
There are several ways to change the text color:
To select the background color:
 If you need to add color frame around text, select the text box, then open Image tab in Inspector and check the Line checkbox, then select a color.
To add shadow, set the Shadow checkbox and set the shadow's color. The distance to the object, shadow angle and blur can be also adjusted with the help of respective controls.
To change the text font, use the Font panel. It can be opened using:
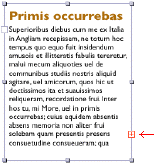
Sometimes text needs more space than a text box provides. Some part of the text goes beyond the borders of the text box and becomes invisible. The text box border displays this with a red plus symbol inside a rectangle. To make all the text visible, you can extend the text box using the selection handles on its sides and corners. Also you can create a linked text box. Text that does not fit in the first text box will flow into the linked one. The border of a linked text box indicates that the text begins or continues in another text box. Text in linked boxes flows between the boxes. This means that when you add a new linked box, text flows into it taking the necessary space (if needed). When you resize one of the existing text boxes, the text flows from the box into the following one if you reduce the size or back into it in case you increase its size. Linked text boxes is a powerful tool for creating multi-column text.
1 - Blank square: this is the first box (beginning of the text) The red cross means that not entire text went into the text box You can add a linked box (new text column) before the first box and after the last one.
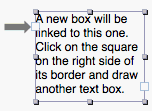
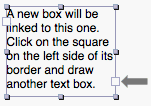
To add a box before the first one, click on a white square at the left side border of the first box and draw a rectangle where a new box will be placed. The text from the original box will flow into the new box to fill it, and only the part that doesn't fit will remain.
To add a box after the last one, click on a white square at the right side border of the last box and draw a rectangle where a new box will be placed. The text from the original box will flow into the new box only if it doesn't fit in the original box.
During the design process text borders may change their appearance but always remain visible. Borders can be hidden by choosing Hide Object Borders from the View menu. To make them visible, use the View/Show Object Borders menu item. When text is selected its text box borders are always shown.
The program has special commands in the Inspector window (in the Columns section on the Text tab) to work with text columns when tab stops are used as the column delimiter.
Use the Line Up to form accurate columns. Note: To make the "Line Up" command work properly, extend the width of the text box so that the text fits completely and lines do not break.
To select an individual column in a text block, on the Text tab of Inspector select the column name in the Select Column by Name list at the bottom of the tab. The column with this name will be selected. This may be useful when you need to apply formatting to the entire column.
Note: The command works only for text taken from the Source panel.
You can check the spelling of text in Disc Cover. Spelling can be checked for the entire text box or for a part of text.
To check spelling for the entire text box, double click on it to enter the text edit mode and select Edit/Spelling/Spelling from the menu. If your text has spelling errors, the program will highlight the first one. Misspelled words will be underlined with a red dotted line. The Spelling window will show the possible options for that word and you will be able to correct or ignore it. Click Next to find the next misspelled word.
At the bottom of the Spelling window there is a list of available languages. The program uses the system spell checker, so the dictionaries available will be those installed in your system.
If you want to check spelling for a part of text, select that part of text and run the spelling check.
You can check spelling without the Spelling window. Select Edit/Spelling/Check Spelling from the menu or press Cmd+";". Every time you do this, the next misspelled word will be shown.
To have the program underline misspelled words at the same time as you type, select Edit/Spelling/Check Spelling As You Type from the menu. The program lets you find and replace a word, number or some character set in a text box.
Double click on a text box to enter the text editing mode and select Edit/Find/Find from the menu. Enter a word you are looking for in the Find text box and click Next. Edit/Find/Find Next will find the next occurrence, Edit/Find/Find Previous - the previous one.
Select a word and choose Edit/Find/Use Selection for Find and the selected word will be the criterion for search.
If you have selected a part of text, the option Jump to Selection will scroll the page (if needed) to make the selection visible.
Spacing
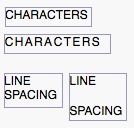 You can change the default spacing value of a text block to the one you need in the Spacing section on the Text tab of Inspector.
Between Characters - the spacing between characters can be applied to the whole selected text box, to the selected part of text or to a single word.
Between Lines - the spacing between lines, can be applied to the whole selected text box or to the selected part of text.
Before Paragraph - the spacing before the selected paragraph.
 Inset Margin lets you control the spacing between the text and text box borders.
By increasing this value, you increase the distance between the text and its border from all sides: top, bottom, left and right.
Lists
 To create a list, select a piece of text or the entire text box. Open the Text tab of Inspector and select the bullet type from the Lists drop-down list.
Linked Text Boxes and Flowing Text
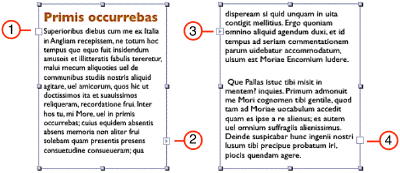
2 - Arrow outside: the text continuing is in another box
3 - Arrow inside: the beginning of the text is in another box
4 - Blank square: this is the last box (end of the text)
Working with Columns
The Default button cancels the results of the Line Up formatting.
Selecting a single column
Check Spelling
Finding and Replacing Text
If you need to replace a word, enter the new word in the Replace text box and click Next and Replace.